

Welcome to my Kimsufi Windows Install Guide. OVH have some very cheap entry level dedicated servers which are branded under the Kimsufi name. The KS1 server which is currently £5 a month including VAT gets you a:
- Atom N2800 @1.86ghz Processor (2 cores, 4 threads)
- 2GB DDR3 ram
- 500GB sata hard drive
- 100mbps connection
- 1x IP V4 address
- Alternatively for £10 a month you can get the same server with 4GB of ram and a 1TB hard drive (KS2 Server)
The only choice of OS for these server however is limited to Linux, OVH used to let you use your own Windows licence, however this is not an option any more.
Not all is lost however, all OVH / Kimsufi servers offer a Linux based rescue system. This is where the servers hard drive is essentially mounted inside a Linux Live CD so you can perform diagnostics or troubleshoot any problems. As the OVH rescue system system gives direct access to the servers hard drive we can use this to deploy a sysprepped Windows install over the internet. Combined with an unattend.xml file this sysprepped Windows install is enough to deploy Windows Server 2012 R2 on the Kimsufi KS-1 and KS-2 servers and have it connected to the internet with Remote Desktop access enabled when the server boots. Esentially think of this tutorial as showing you how to install Windows on a server, remotely over the internet.
In this Kimsufi Windows Install tutorial we are going to:
- Install Windows Server 2012 R2 in a Virtual Machine
- Configure our installation in the Virtual Machine so Remote Desktop is enabled and windows firewall will allow connections to remote desktop from the internet
- Sysprep the Windows install, this is so Windows will boot and setup new hardware once deployed to our real Kimsufi server
- Still in the Virtual Machine, we will boot a Linux Live CD to image the Windows install with dd.
- Finally will deploy the sysprepped Windows image we made with dd over the internet to the Kimsufi server, via the OVH Linux recovery system.
This might sound quite complex, however its actually quite easy when broken down in to steps.
Some thing to keep in mind:
You will have to upload at least a 4gb compressed image of a Windows Server install from your home connection to your OVH server. Be aware this can take a long time depending on your internet connection’s upload speed.
For me it took around an hour to upload just over 4gb with a 12mbps upload, if you had a 1 mbps upload speed that could take you well over 8 hours, so be warned that might be the most time consuming part of this tutorial for you.
Why Install Windows Server on an Intel Atom Based Device?
You might think why install Windows Server on such an under powered server, especially considering the cost of a Windows Server licence?
Well Microsoft give free Windows Server 2012 R2 licences to students via Dreamspark, all you really need is a college / university email address and you can gain access to some great software via Dreamspark. This is where the Kimsufi server comes in, I think its the perfect server to install a copy of Windows Server on, to learn and experiment with the OS. Despite been quite low powered the Atom N2800 is more than capable for this task. The server will have it’s own unique IPv4 and IPv6 address on the internet, so you could deploy an application in the real world using IIS, or even experiment with setting a VPN up. The 2gb of ram is more than enough for this purpose, and to be honest that’s how i ended up starting with this blog. I wanted something to share with the world when I was experimenting with IIS and Windows Server. The 100mbps connection and 500gb of hard drive space are a nice bonus too!
Before we begin:
I have tried to make this tutorial as detailed as possible and explain the best I can, providing screenshots of what i’m doing. However some basic knowledge of Windows, Linux, Drivers, Networking and Virtual Machines will be a great benefit to you.
This guide is aimed at the OVH / Kimsufi KS1 and KS2 Servers, however the same principles basically apply to any OVH server.
Kimsufi Windows Install Guide – Install Windows Server 2012 R2 on OVH’s Kimsufi KS1 / KS2 Server:
When you get the Kimsufi KS1 / KS2 server you will have to choose an OS to install on it. You will get an email with a link to log in the server manager and do this. For the OS I chose Ubuntu Server, we can easily get the hardware, such as what network card is in the server by using Ubuntu. Once Ubuntu is installed you will get an email with details to connect to the server via SSH: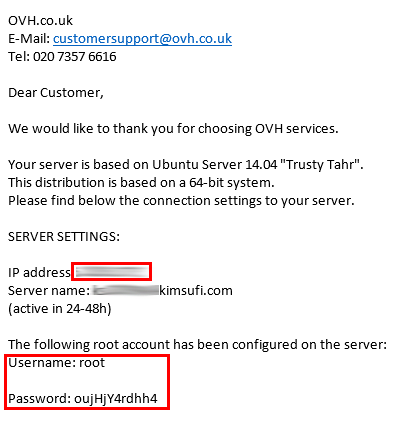
Now you simply want to use Putty to SSH in to the server.
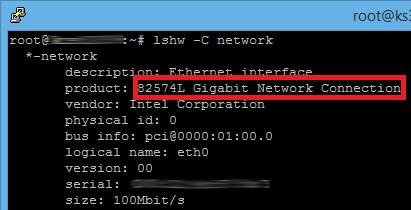
Once you have SSH access simply type:
[syntax type=”html|php|js|css”]lshw -C network[/syntax]
You should then be able to find out what network card is present in your server. Windows Server 2012 R2 has drivers out the box for the Intel 82574L so we do not need to worry about this later on. However depending on your network card you might need to find drivers for use on Windows.
With the current Kimsufi servers it’s easy to tell which network card the server has by the processor that’s in it, however by knowing the above you can easily find out in the future when the server hardware will no doubt change.
Atom N2800 = Intel 82574L (Both Windows Server 2008 R2 and Windows Server 2012 R2 have drivers natively for this)
Atom D425 = RTL8101E/RTL8102E (Windows Server 2008 R2 does not have drivers, Windows Server 2012 R2 might) – Drivers can however be downloaded from here: RTL8100E/RTL8101E/RTL8102E-GR/RTL8103E(L) Drivers
Installing Windows Server 2012 R2 in a Virtual Machine:
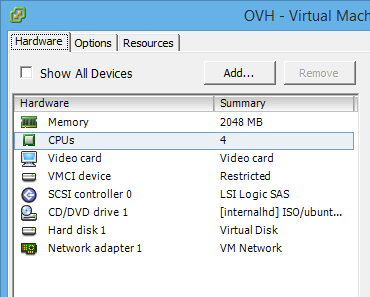
It doesn’t really matter what software you use to run a Virtual Machine. I used VmWare ESXI, however that requires a dedicated machine to run on. VmWare Player would be fine as the options are similar to ESXi which i use in this tutorial, as would VirtualBox.
You want to create a Virtual Machine with similar specifications to your Kimsufi server and then install Windows on this Virtual Machine. I simply assigned 2GB of ram to the virtual machine and 1x CPU with 4x Cores.
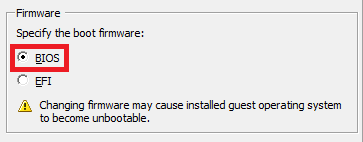
In VmWare ESXi you have the choice between BIOS and UEFI for the Virtual Machine boot options, i chose BIOS as that’s what the Kimsufi server uses. I’m not sure how much this matters anyway when sysprepping a Windows install, however i tried to keep the hardware of the virtual Machine similar to what is in the real Kimsufi server.
Now install Windows Server 2012 R2 as you normally would in the Virtual Machine.
Use one of the following default keys to allow Windows to install, however not activate:
Datacenter: Y4TGP-NPTV9-HTC2H-7MGQ3-DV4TW
Standard: DBGBW-NPF86-BJVTX-K3WKJ-MTB6V
Essentials: K2XGM-NMBT3-2R6Q8-WF2FK-P36R2
You do not want to use your legit and valid key until you have Windows running on your Kimsufi server, otherwise you will end up activating the Virtual Machine, which will cause you issues with activation later on.
Once Windows Server 2012 R2 is installed you can set an Administrator password (remember this!). You then want to do a couple of things before we sysprep the image for deployment on the Kimsufi server.
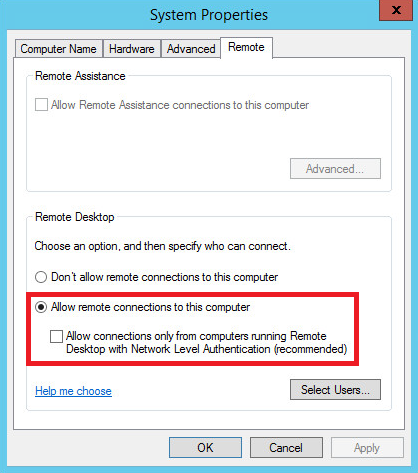
First enable remote desktop:
Right click on Computer > Properties > Advanced System Properties > Remote
Then enable “Allow remote connections to this computer”:
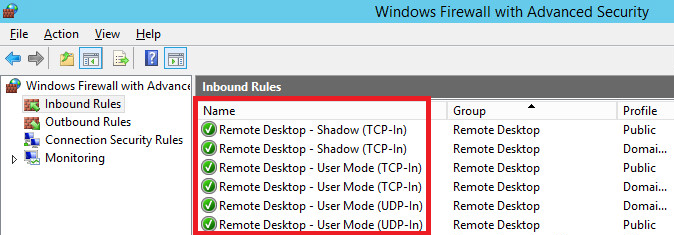
Allow Remote Desktop Connections in Windows Firewall:
Go to Control Panel > Windows Firewall > Advanced Settings and enable:
- Remote Desktop – User Mode (TCP-In)
- Remote Desktop – User Mode (UDP-In)
- Remote Desktop – Shadow (TCP-In) (This is optional)
Do this for both public and domain profiles to ensure Windows Firewall does not lock us out the server later on.
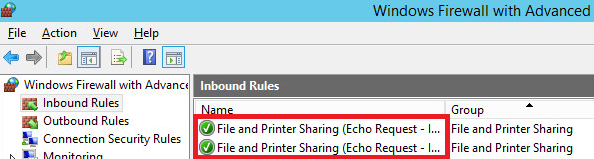
Allow the server to be pinged in Windows Firewall:
Go to Control Panel > Windows Firewall > Advanced Settings and enable:
- File and Printer Sharing (Echo Request) IMCP V4 In
- File and Printer Sharing (Echo Request) IMCP V6 In
This is handy so we can ping the server and is required if you wish for the OVH manager to monitor the server.
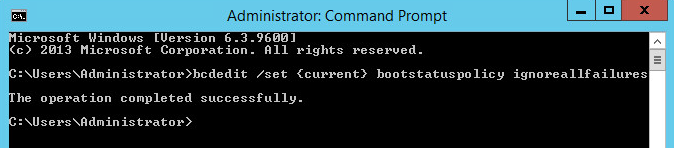
Disable Windows Error Recovery On Startup:
Disabling Windows Error Recovery will prevent the system getting stuck when starting up.
Open a Command Prompt with Administrator rights (Right Click > Run as Administrator) and type:
[syntax type=”html|php|js|css”]bcdedit /set {current} bootstatuspolicy ignoreallfailures[/syntax]
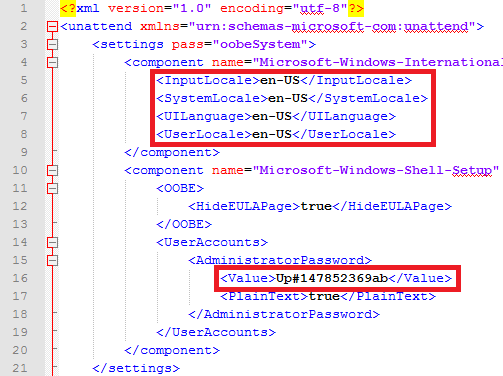
Setup the unattend.xml file:
The easiest thing to do here is download my unattend.xml file and edit it as required in Notepad++. This unattend.xml file is for the English language version of Windows Server 2012 R2 and will probably not work with other versions of Windows.
Essentially if you have a non English language version of Windows Server you will need to edit the:
- InputLocale
- SystemLocale
- UILanguage
- UserLocale
You would change this to match the language of your copy of Windows Server 2012 R2. You can’t leave the settings as they are for a French version of Windows for example.
If you have the English version of Windows Server 2012 R2 all you need to edit here is the password for the Administrator account, set this to be the same as the password currently is currently on your Virtual Machine:
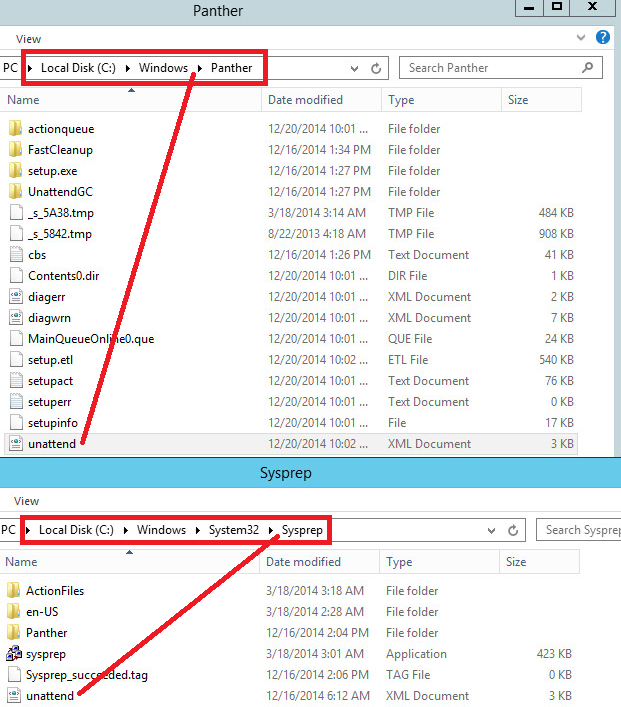
Now copy the unattend.xml to c:\windows\panther and c:\windows\system32\sysprep
You are now basically ready to sysprep your Windows Install to be deployed to the Kimsufi server. Now you can do any other customizations you wish to make can be made. However keep in mind if you start installing apps, updating Windows or setting things up, the larger the image you have to upload will be. My advice would be to update Windows and install things once you have deployed the image to the Kimsufi server.
If you need to install additional drivers for your server now would be the time to do it:
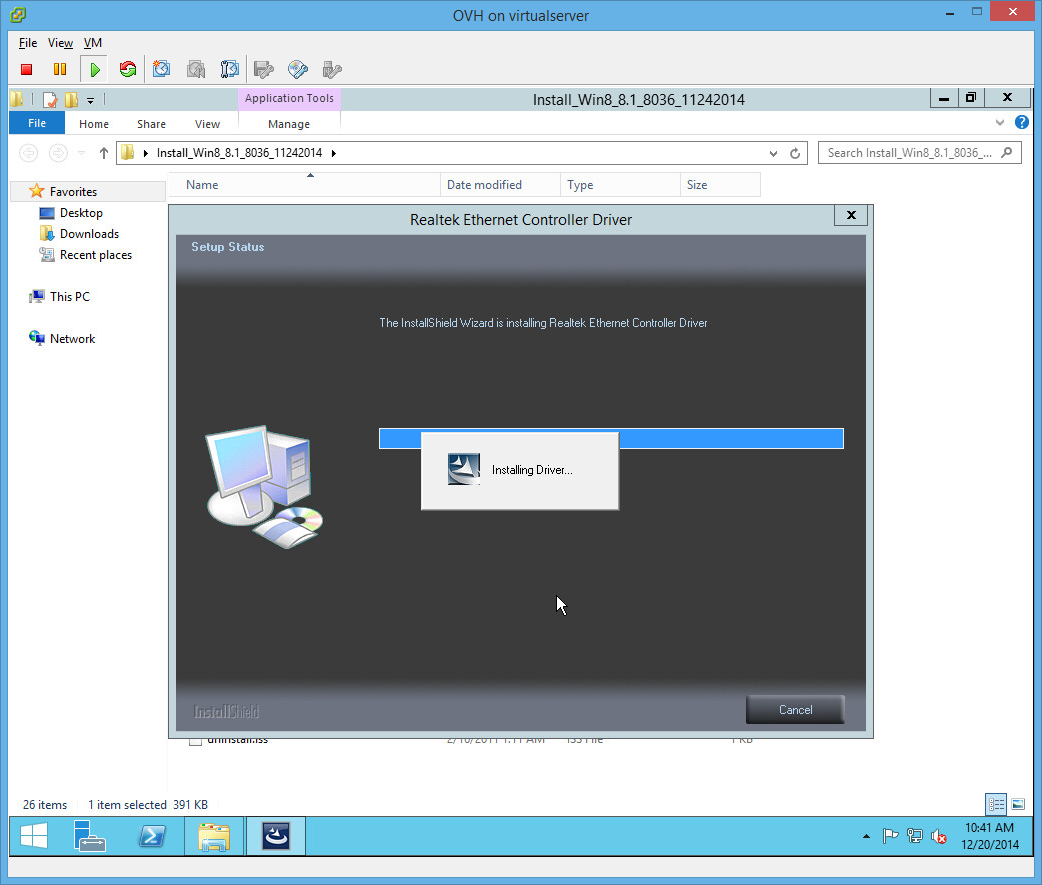
If you get a Kimsufi server at the moment with the Atom N2800 processor I can confirm that you do not need to install any additional drivers for the Kimsufi KS1 and KS2 server to get Windows Server 2012 R2 setup and working.
Syspreping our Windows Server 2012 R2 install:
Sysprep can be used to prepare an operating system for disk cloning and restoration via a disk image.
Windows operating system installations include many unique elements per installation that need to be “generalized” before capturing and deploying a disk image to multiple computers. Some of these elements include:
- Computer name
- Security Identifier (SID)
- Driver Cache
Sysprep solves these issues by allowing the generation of new computer names, unique SIDs, and custom driver cache databases during the Sysprep process.
To sysprep you Windows Server 2012 R2 Virtual Machine you need to open a Command Prompt with Administrator rights and type:
[syntax type=”html|php|js|css”]cd \windows\system32\sysprep[/syntax]
Then:
[syntax type=”html|php|js|css”]sysprep /generalize /OOBE /shutdown /unattend:unattend.xml[/syntax]
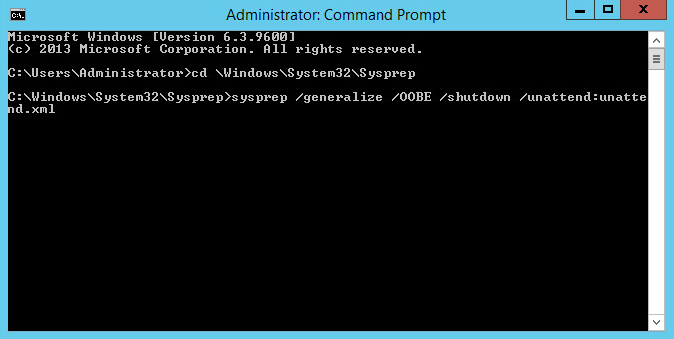
Window will now sysprep and the Virtual Machine will shutdown once this is complete.
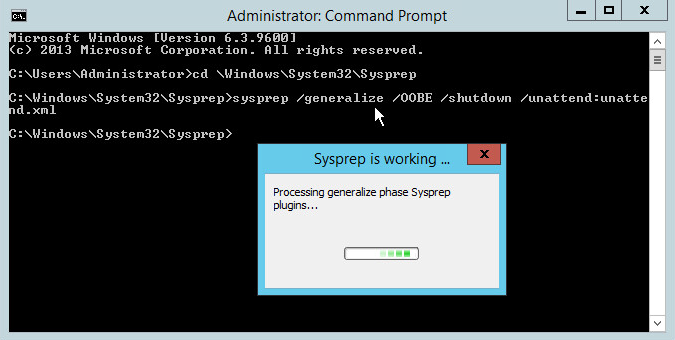
Note: It’s very important you do not boot in to Windows again on this Virtual Machine. If you do then you will have to sysprep the Virtual Machine again.
You now need a computer or Virtual Machine on your network running Linux:
If you have a server on your local network running Linux then all you need to be able to do is SSH in to this computer to continue with this tutorial. This computer must have enough hard disk space to recicve a compressed DD image of your Windows Virtual Machine that we just setup. My image was around 4gb, this will however vary depending on what you do with your Windows Server 2012 R2 VM.
**This part of the tutorial is optional if you have a computer running a variation of Linux on your network**
If you don’t have a computer running Linux then I would download a copy of Ubuntu Desktop and install this in another Virtual Machine.
Once installed open up a Terminal. To Install OpenSSH type in:
[syntax type=”html|php|js|css”]sudo apt-get install openssh-server[/syntax]
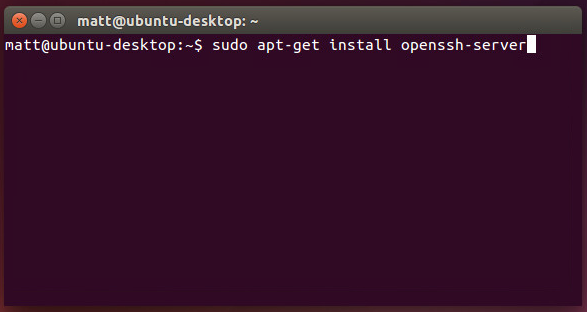
We will need to connect to connect this computer / Virtual Machine via SSH later on to store the DD image of our Windows VM.
Once OpenSSH is setup you simply need to make a note of this computer / Virtual Machine’s IP address
Simply type:
[syntax type=”html|php|js|css”]ifconfig eth0[/syntax]
Then make a note of the IP address:

Making an image of the Windows Server 2012 R2 Virtual Machine with DD:
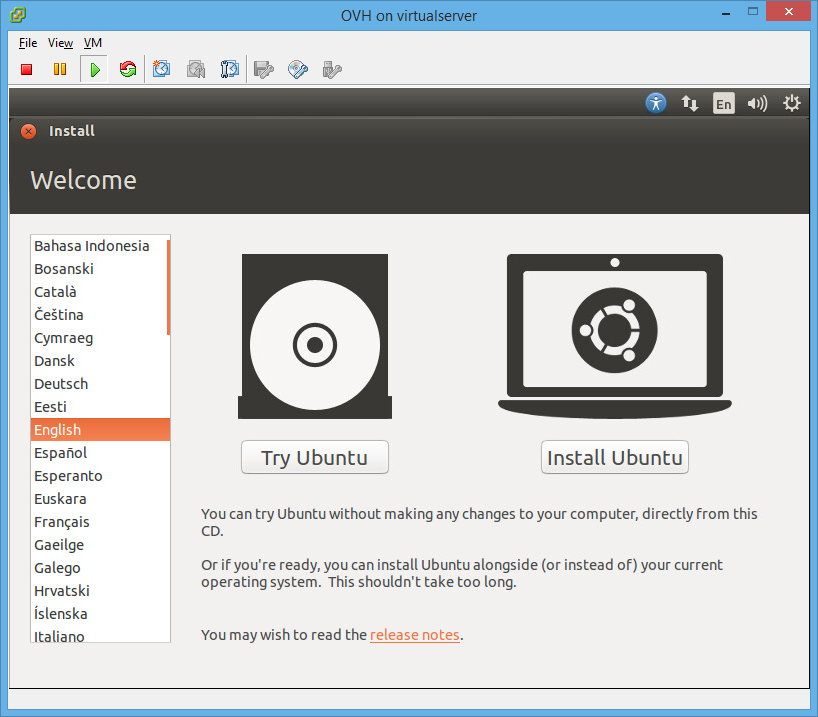
With your Windows Server 2012 R2 Virtual Machine powered down you want to mount a Linux Live CD ISO in the Virtual Machines CD drive. For this i used the Desktop version of Ubuntu.

You then simply want to ensure the Virtual Machine is set to boot from the CD drive, or set the Virtual Machine to boot in to the BIOS when next started so you can change the boot order making the CD drive the first boot option:
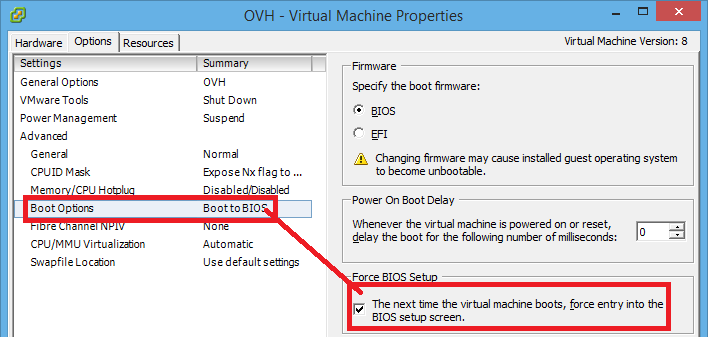
Basically you want your Windows Server 2012 R2 virtual machine to boot the Ubuntu Desktop ISO. When it does click “Try Ubuntu” and you will end up at the Ubuntu Desktop with the Windows hard drive mounted.
When you have successfully the Ubuntu Live CD you need to open up a Terminal and type:
[syntax type=”html|php|js|css”]
sudo dd if=/dev/sda bs=16M | xz -1 | ssh -p 22 matt@192.168.1.108 “dd of=/home/matt/windows1.dd.xz bs=16M”[/syntax]
- matt = this is the user account on the Ubuntu Desktop Virtual Machine you set-up (or the existing Linux machine on your network)
- 192.168.1.108 = this is the IP address of the Ubuntu Desktop Virtual Machine you set-up (or the existing Linux machine on your network)
- /home/matt/ = this is your home folder on the Ubuntu Desktop Virtual Machine you set-up, change /matt/ to what ever your username is on the Linux machine.
All been well you will be asked to enter the password to connect to your Ubuntu Desktop Virtual Machine, from the Ubuntu Live CD which is running on your Windows Server 2012 R2 Virtual Machine:
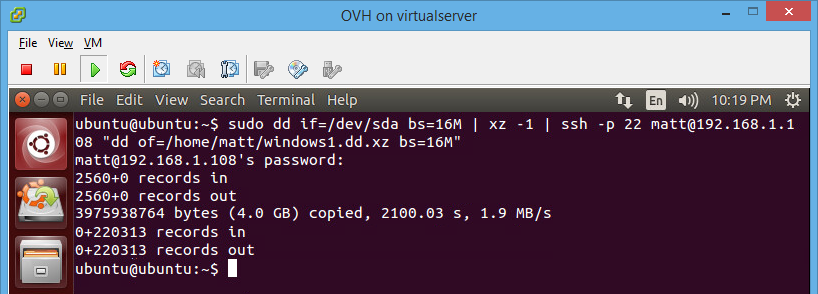
The hard drive of your syspreped Windows Server 2012 R2 install will now be compressed and transferred to your Ubuntu Desktop Virtual Machine. This took around 40 mins for me.
On your Ubuntu Desktop Virtual Machine (Or Linux machine on your network) you should end up with a file called windows1.dd.xz in your home folder:
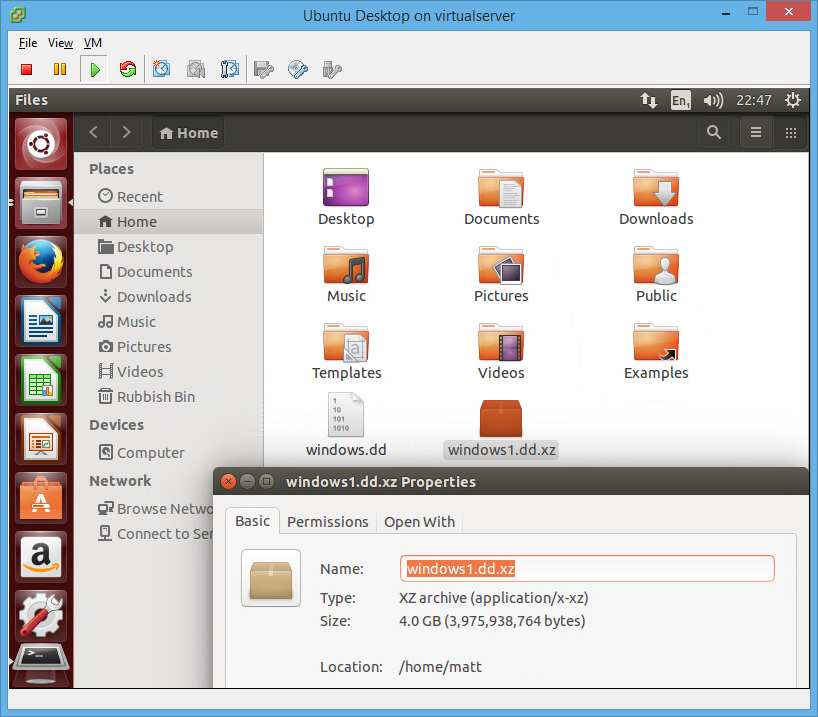
If so congratulations you have imaged your Windows Server 2012 R2 install, and it is now ready to deploy to your Kimsufi server.
Deploying The Windows Server 2012 R2 Syspreped Hard Drive Image To The OVH / Kimsufi Server:
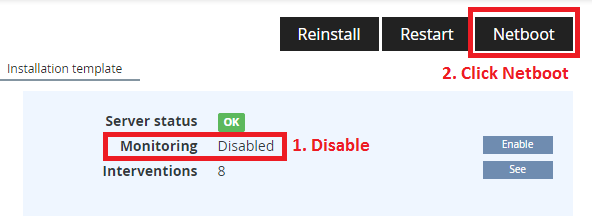
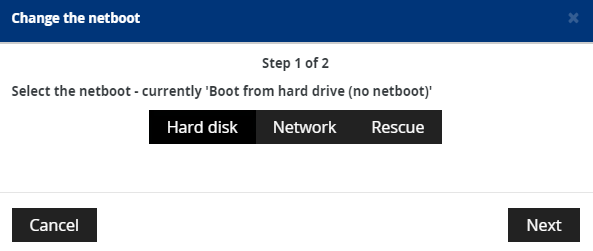
Log in to your Kimsufi server manager account at https://www.kimsufi.com/fr/manager
First you want to disable server monitoring and then click “Netboot”:
You want the server to boot in to “Rescue”:
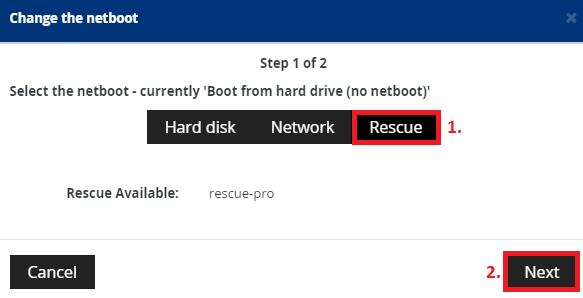
Now back in the Main Menu of your server manager click “Restart”:

The server will boot in to the Linux rescue mode and you will be sent an email with the ip address, username and password to connect over SSH on.
Now everything is in place to allow us to deploy the sysprepd image of Windows Server 2012 R2 we have backed up and compressed with dd.
On our Ubuntu Desktop Virtual Machine (Or the Linux computer on your network) we are going to upload this image to the Kimsufi server via SSH and deploy it to the servers hard drive.
TOpen up a terminal Window and type:
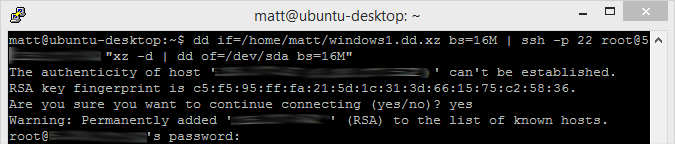
[syntax type=”html|php|js|css”]dd if=/home/matt/windows1.dd.xz bs=16M | ssh -p 22 [email protected] “xz -d | dd of=/dev/sda bs=16M”[/syntax]
- /home/matt/ = matt would be your username
- 37.000.00.000 = this would be the ip address you got in the email to connect to your server in rescue mode
You will be warned the authenticity of host ‘37.000.000.000 (37.000.000.000)’ can’t be established.
RSA key fingerprint is 27:a8:e3:f2:69:1a:bc:f9:49:03:90:b8:a4:7d:39:fd.
Are you sure you want to continue connecting (yes/no)?
Say yes here and all been well your image should start to upload over the internet to your Kimsufi server:
By default you will notice it looks like nothing is happening, however i can assure you it is.
If you open another terminal and type in:
[syntax type=”html|php|js|css”]watch -n60 ‘sudo kill -USR1 `pgrep ^dd`'[/syntax]
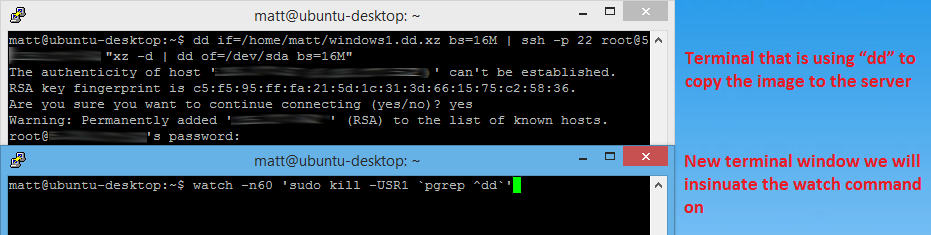
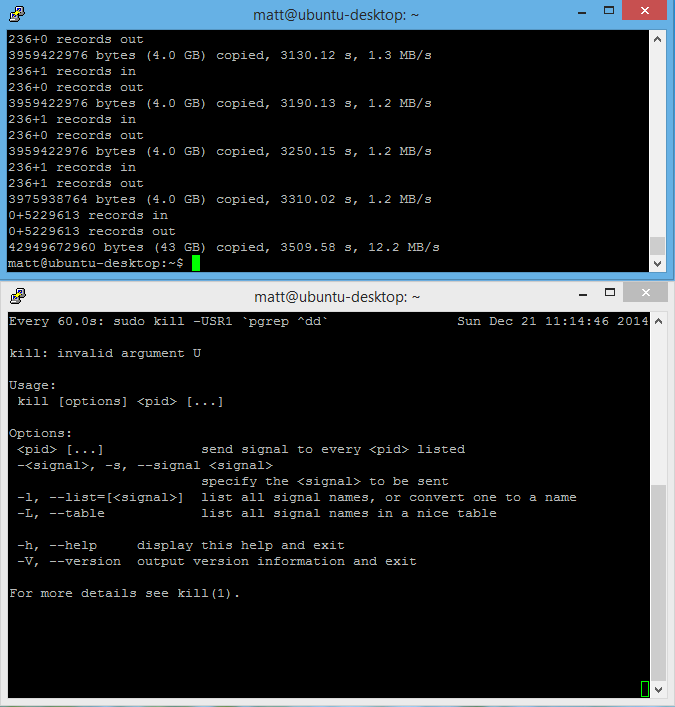
The speed of the transfer and the amount of data transferred will be printed to the Terminal every 60 seconds:
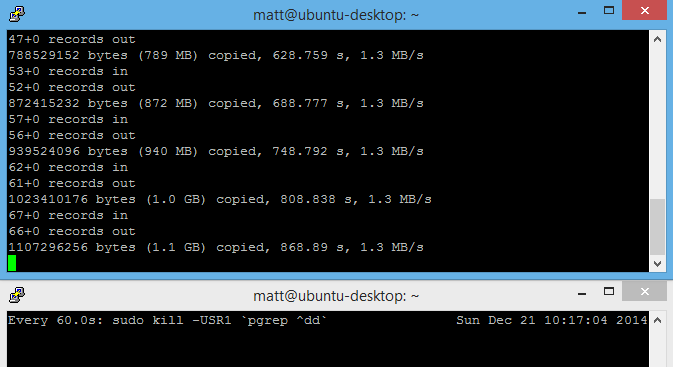
As i mentioned earlier the time this takes will vary massively depending on your internet connection, with a 12mbps upload it took me around an hour to upload just over 4gb. This could easily take you over 8 hours if you have a 1mbps upload.
When the upload has finished you should see something which looks like this:
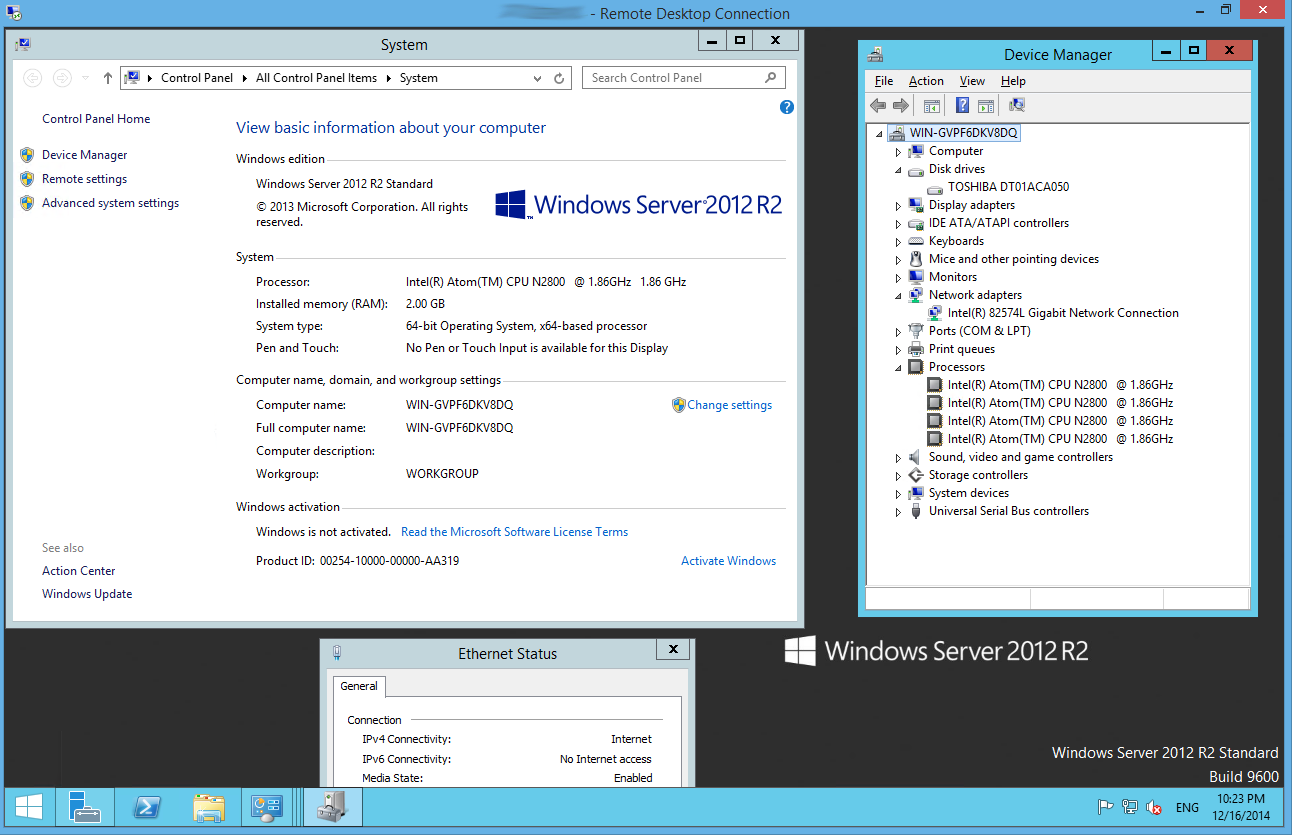
Now the syspreped image of our Windows Server 2012 R2 install has been deployed to the Kimsufi server, go back to the web manager for your server and change the netboot back to the hard drive, then re start the server again:
Now you need to cross your fingers. After 5 minutes your Kimsufi server should have re started and booted Windows from the sysperped image we deployed. You should now be able to connect to the server via remote desktop. If so congratulations the hard part is now over!
As can be seen below the syspreped image has been successfully deployed to the Kimsufi server, windows has booted on the Kimsufi server and setup all the hardware, finally obtaining an ip address, allowing us to Remote Desktop in to the server:
All you really need to do now is a bit if tidying up / tinkering
Tidy up your new Windows install on the Kimsufi Server:
When you first connect to the server you will be presented with the following:
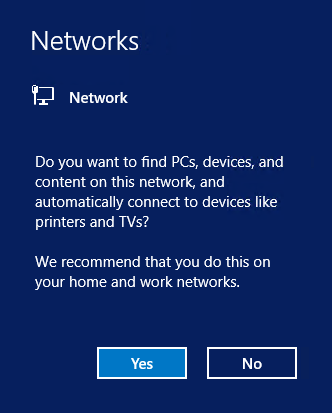
Say no to this question as your server is connected to a public network.
Now delete the unattend.xml from c:\windows\panther and c:\windows\system32\sysprep
Next you will notice the hard drive space is limited to the amount that was available in your Virtual Machine, so we need to extend the partition of the C:\ drive.
Search for Computer Management on the start screen and click Disk Management, then right click on the C:\ drive and click Extend Volume:
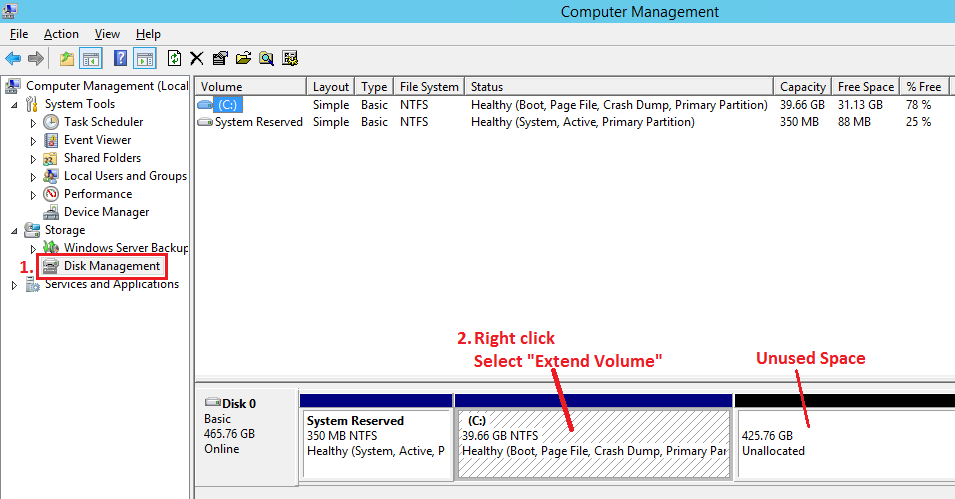
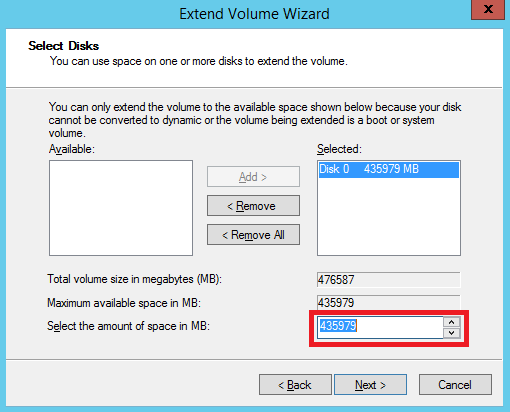
You then simply want to select the maximum amount of space available:
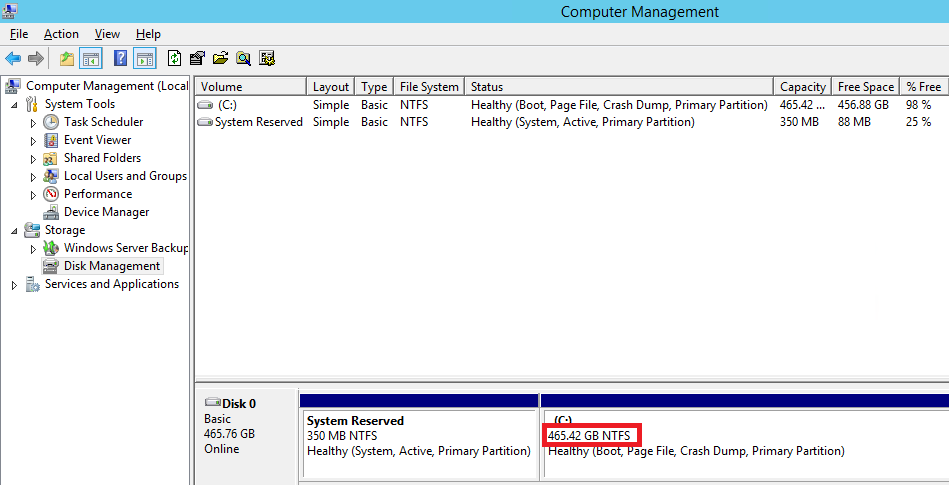
After that you will be able to use all the space on the servers hard drive, of course you can partition the drive as you please:
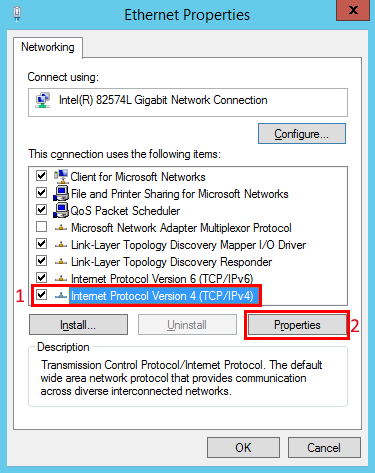
Static IPv4 Setup:
Your server will have automatically obtained it’s assigned IP address via DHCP, however I would personally configure this to be a static IP, as OVH do this by default on all servers.
Simply go to Network > Network Sharing Center > Change adapter settings > Ethernet > Details then make a note of the IPv4 Address, IPv4 Subnetmask, IPv4 Default Gateway and IPv4 DNS server, then click close:
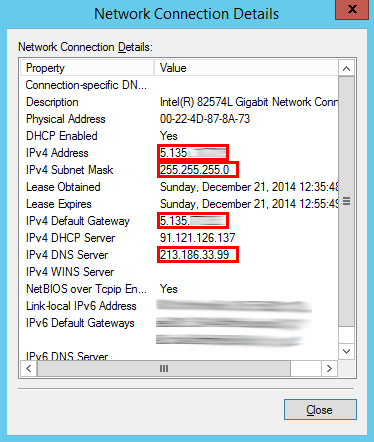
Click on Internet Protocol Version 4 (TCP/IPv4) and click properties:
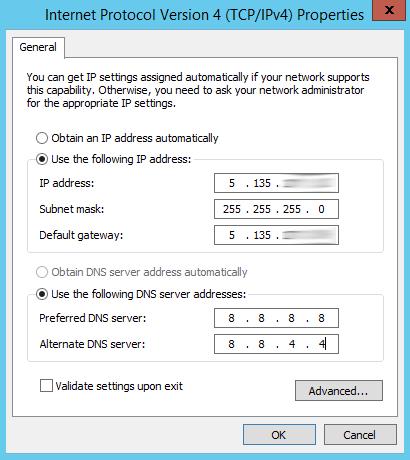
Enter the details you made of note of, here i have used the Google DNS servers instead:
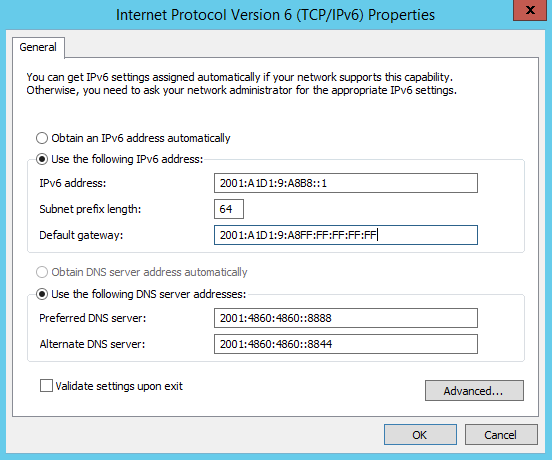
IPV6 Setup:
First log in to the Kimsufi / OVH manage and find the IPv6 subnet you have been assigned, then follow my example below to assign your server an IPv6 address and workout what your default gateway should be.
Example:
IPv6 Subnet in OVH Manager: 2001:A1D1:9:A8B8::/64
IPv6 Address: Remove the /64 from your IPv6 subnet and add a 1 to the end, your severs IPv6 address would now be 2001:A1D1:9:A8B8::1
Gateway: Remove up to the last two numbers of the IP address (B8::/1) and replace with FF:FF:FF:FF:FF, so in this example the gateway would be 2001:A1D1:9:A8FF:FF:FF:FF:FF
Subnet Prefix Length: This is simply 64
For the preferred DNS and alternate DNS server for IPv6 I use Google DNS service:
- Preferred: 2001:4860:4860::8888
- Alternate: 2001:4860:4860::8844
So all entered in to the servers IPv6 configuration would look like this:
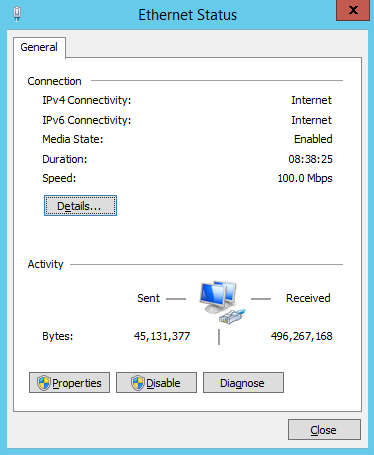
You should end up with internet for IPv4 and IPv6 connectivity now:
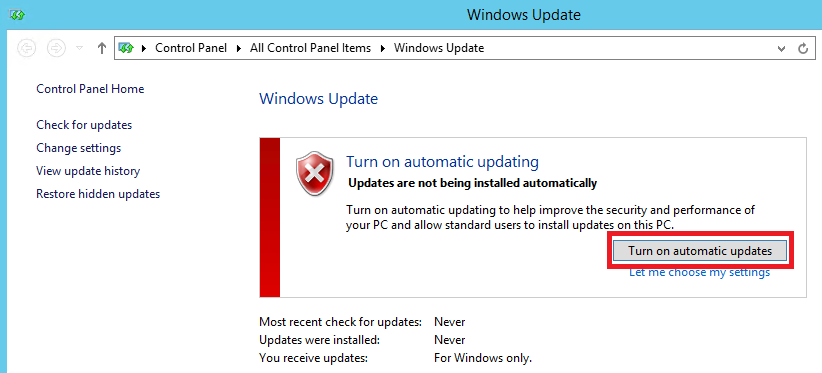
Update the server:
Next go to Control Panel > Windows Update and turn on Automatic Updates, then let the server install all the updates available:
You are now basically finished and free to configure the server as you please!
However I would suggest:
- Creating another Administrator account and disabling the default “Administrator” user account so if anyone does try to bruit force Remote Desktop access to your server they will get no where by using default account names.
- Limit Remote Desktop access to certain IP addresses – You can only really do this if you have a static IP address, or another server with a static IP address. This means you can only even attempt to Remote Desktop to the server from a “trusted location”.
- If you are unable to limit what IP addresses can access Remote Desktop then i would change the default port form 3389 to something random. At least any automated bot simply trying to connect on port 3389 would get no where, however it wouldn’t stop someone from port scanning your server and finding out what port Remote Desktop is actually listening on. If you do change the Remote Desktop port, remember to open the port you are changing to first on Windows Firewall, if not you will lock yourself out your server.
Hopefully someone will find this tutorial to be useful, I have installed Windows on a few Kimsufi servers like this perfectly fine. If you have any questions i’ll do my best to try and answer them.
65 Comments
Nice work.
Thanks but can we use if for video rendering ?
You probably could on the higher end Kimsufi servers (KS 3-6), not the lower end Intel Atom based ones though.
Hello Matt,
Congratulations on the tutorial!
I did exactly as in your tutorial, but it worked for me.
In this image (https://matthill.me.uk/wp-content/uploads/2014/12/dd-windows-vm-os-15.png) shows 43 GB copied here appeared to me only 2 GB.
Another thing is that image, your file windows1.dd.xz he is 4 GB, my image has only 350 MB, you’d tell me why that is as small as?
I am using the Standard version only, and my language is en-US.
hug,
Allan Almeida
Just redo the tutorial and did not work right, it was copied 4.5GB of files to the server in rescue mode.
I did everything exactly as your tutorial, but it did not work the same.
It appears it’s all right to the part that will send the file to the server dd in rescue mode, after that I do and reboot the server does not connect even if I do not know the problem.
Allan Almeida
Which Kimsufi server do you have? and what network card does the server have?
Hey your a legend.
I have been looking how to do this for years and tried a few methods that always failed. This worked perfect. Only think my upload speed is 70KBps so took about 24hrs to upload the image to the server but apart from that its simple and works.
Top job
Anything different for setting this up on KS4?
I’ve never had a KS4 so couldn’t say for definite, it mainly depends what network card the KS4 server has, which you can find out if you install Linux on the server first. If you get the drivers in your image theirs a good chance it will work fine!
If you can get Windows to boot with network connectivity, that’s all you really need to get any other drivers installed after.
Good luck!
The KS-4 I got from kimsufi US (Canada server) has 82579V network card and windows server 2012 R2 does not have a default driver for this network card, So you need to install the driver in your VM program before you make the sysprep image
Yes, Windows should load the drivers for the network card when it first boots and obtain an IP address from OVH (The same IP address it had with Linux).
I didn’t read the whole post, but do you need to buy windows server 2012 ? I used some trial or evalution copy on my previous VPS..
Yes you would need to own a copy of Windows Server 2012, you can use a trial copy if you wish or use a copy from Technet or MSDN.
Matt, how do you connect to the internet when launching ubuntu live cd on the machine, where Windows is installed? I am having problems with this.
It should just obtain an IP address from your router and connect, what software are you using for your virtual machines? have you added a network card to the virtual machine?
Ubuntu is pretty good at just working in virtual environments, however it’s possible it might not have drivers for the network card your virtual machine is trying to emulate.
I also had this problem. Try downloading linux mint and boot from that image. I am not sure why but in vmware player ubuntu booting from umage internet did not work but linux mint did. Also found that virtualbox will allow ubuntu internet to work from image boot but you will have to reinstall windows in virtualbox and set it all up again if you go that route
Hello,
I have a problem.
After the first or second restart the KS-1 no longer rises.
What can be? I used images of Joodle.
What Windows OS are you trying to install? Also what do you mean by “I used images of Joodle”?
Joodle has images that have drivers preloaded so you dont have to compile the sysprep and add drivers but he uses evaluation copy of windows so there is a good chance the evaluation period ran out why you cannot access it. To use them images you have to upgrade windows to full version threw command prompt and enter your product key.
Hello Crazy,
Evalution period is remove from my license.
My problem is when rebooting the server is no longer on the boot hard drive and technicians in the data center always put me in rescue.
I partially solved with this command:
bcdedit /set {current} bootstatuspolicy ignoreallfailures
But to make it start after a reboot I have to carry out other reboot hardware from panel and machine part.
Sorry for my bad english, i’m italian.
Great tutorial Matt, i got my KS1 to work perfectly fine.
Thank you
Great tutorial!
But my server is not willing to get activated when I’m connected via Remote Desktop. Do you have an idea why i can’t activate it?
Once connected via remote desktop have you added a valid product key which has not been used to activate windows before?
Hello mate! nice guide! but I have problem when I start Ubuntu Live in the VM that have Windows 2012 installed, I just can’t get ethernet connection and don’t know why? I installed another VM for Ubuntu Desktop and there the ethernet connection starts without problems but in the VM of Windows 2012 when Ubuntu Live ISO starts, it appear a WIFI icon and don’t know how to disable it and give ethernet connection, do you have any idea how can I fix? because I can’t send the disk file to the other VM of Ubuntu Desktop because the Ubuntu Live don’t have any type of network connection.
Try changing the type of network adapter the virtual machine is emulating. I was using VmWare ESXI for my VM and used the E1000E which Ubuntu supported out the box.
Or there is not another way to save the syspreped Windows Server 2012 R2 install compressed in the same Windows Server 2012 disk? or save to a USB stick connected to the VM of Ubuntu Live @ Windows Server VM?
I’m using VMware Workstation, how can I do it? Please I’m stuck in this step more than 6 hours 🙁
Any skype contact?
Hey, I just gave a try to Xubuntu Live CD and it detects the network!! The command should be the same true?
sudo dd if=/dev/sda bs=16M | xz -1 | ssh -p 22 [email protected] “dd of=/home/matt/windows1.dd.xz bs=16M”
Hey mate, now I’m uploading the windows1.dd.xz to the Kimsufi server so I have to wait some large hours, I have a question about this image: https://matthill.me.uk/wp-content/uploads/2014/12/dd-windows-vm-os-15.png
Why it goes from 4.0 GB to 43 GB copied? The windows1.dd.xz file is supposed to have a size of 4.0 GB…
The .xz files are compressed images, once uploaded the image is uncompressed. The additional 39gb is just empty space though (which is why it compressed so well).
Finally I finish with this setup and all thanks to this GREAT tutorial!! Thank you very much Matt!!
I tried with Windows Server 2012 but with 2 GB I feel some lag so I would like to test this in another kimsufi server but more powerful, I look at the KS-3 (Core™ i5-750 with 16 GB RAM) and I would like to ask you if your tutorial will works on this server? I ask this because you said something about the network driver may be different in other servers that don’t have an ATOM N2800, how can I do in this case to install Windows in a KS-3 Kimsufi server?
Thanks again for this great tutorial!
Install Linux on the server first and see what network card is present in the server. Just search online and include this driver in your virtual machine before syspreping it. In theory this tutorial should then work, but it’s going to be trial and error if it doesn’t.
Great Tutorial! i would eventually consider changing the RDP Port to a custom Port. this can be done here:
HKEY_LOCAL_MACHINE\SYSTEM\CurrentControlSet\Control\Terminal Server\WinStations\RDP-Tcp
PortNumber is a REG_DWORD
Of course you’d also have to create and enable a custom firewall rule for all network profiles.
to put 3389 in the wild is very questionable these days 😉
-chris
Indeed, i did mention that at the end of the tutorial, good of you to provide the location in the registry to do so!
I personally only allow certain static IP addresses to connect to port 3389 which works well for me.
Mate, what is the process to follow if I’m installing Windows 2008 Std R2 64 bit (Spanish) respecting to the unattend.xml file? What I have to edit exactly for this OS?
Ok so I’m stagnant in the unnattend part because in this 2nd time I’m trying to do this with a Spanish version of Windows 2008 Std R2 64 bit, so I tried to leave the file as yours and I got this:
https://www.dropbox.com/s/9lsjcyj9ilxmth5/unattend%20for%20Win2008Std64bitSpanish.xml?dl=0
But I think I have to delete more info from this file to make it work, what do you think? how should finally be to work?
P.S. KS-4 comes with the Intel 82574L network card 🙂
Hi, I was considering on getting either a server from kimsufi (the ks-3) or the online.net counterpart and since I’ve been using scripts to get a kimsufi and have yet to succed I was wondering if your guide would work with online.net (they actually do offer to have windows installed out of the box but you have to pay 29€ per month) and I have my student license which they do not accept)
It would really depend if online.net have a “recovery feature” like OVH where you can mount the hard drive and write data to it over the internet.
Hey Matt, please give me a hand with the creation of the “unattend.xml” file but for Windows 2008 Std R2 64 bit (Spanish) I don’t know how to generate it 🙁
Its not working on OVH MC-32, the Server is not reachable. Followed all the steps. I think has somthing to be releated to thee network card. In my Server a Ethernet Connection (2) I218-V is build in.
Did you install the drivers for that network card in the virtual machine? https://downloadcenter.intel.com/product/71305/Intel-Ethernet-Connection-I218-V
Yes I did
You don’t need to use sysprep on server 2012 anymore, just install it on your virtual machine and copy it to your server with dd works fine.
are you serious? why? also do you know how to generate the “unattend.xml” file but for Windows 2008 Std R2 64 bit (Spanish)?
Yes, i’ve installed server 2012 without sysprep on multiple servers hostet by different providers and it always worked.
There are plenty of generators you could use for server 2008, for example: http://windowsafg.no-ip.org/server2008.html
hi,mate,are you install windows server 2008 ok?and can you share the way to install windows server 2008 on Kimsufi KS-1? or how to make own dd image? Thanks a lot!
Hey Matt, where I can find a full detailed list of the network drivers included in Windows Server 2012?
For example I ordered a KS-4B that comes with a i5-3570s proccesor but I can’t install windows on this because of the network card drivers that are not included in Windows 2012.
I know that now I have to search for the drivers and install it on my Windows 2012 Virtual Machind before the sysprep but anyways I would like to ask you how you can know if the network driver of some processor are included in Windows 2012 or the SO you want to install. That’s to avoid loss time preparing a sysprep that maybe will not work because of missing network card drivers.
Thank you for your time and nice guide!
I had some hardware which contained an Intel 82574L which is how I knew Windows Server had drivers out the box, unfortunately I’m not sure of a way to get a list of all the drivers for hardware Windows Server will support out the box unfortunately.
The quickest way to try follow this guide on other hardware might just to be include the network drivers when setting up the VM, in theory you should have no problems then.
If you get the network drivers you can worry about any other drivers later as you can get Remote Desktop access and configure as you like from there.
By any chance a video tutorial for this
Once sysprep is done, how do I get the DD image of my machine?
You need to boot the Ubuntu DVD from the machine that you wish to image, you can then use DD to make an image of the hard drive.
Hi Matt, I tried it on ovh ssd vps and I am getting “INACCESSIBLE BOOT DEVICE” in their KVM window.
Any ideas?
I think OVH use a SAN for the VPS’s storage, Windows probably doesn’t know how to handle this when booting your syspreped image, so fails to boot. That would be my guess anyway.
OVH’s “Cloud VPS” range supports Windows, where as the SSD VPS’s don’t, so you might have more luck with a Cloud VPS.
This tutorial is aimed at getting your own copy of Windows on to real hardware, not a Virtual environment setup for Linux. I’m not sure how much luck you will have unfortunately.
The KS1 server is not that much more than the cheapest VPS SSD, so that might be worth considering over a VPS.
Good luck all the same.
Hi Matt!!! Really thanks for your guide!!! It’s really helpfully!!! I’m right in big trouble… i activated windows firewall on my windows 7 on kimsufi server and i can’t get inside anymore! I have all my data inside!!! Is there any chance to fix it? Many thanks in advance!
Filippo
The only thing I can think of is OVH have a recovery mode which mounts the physical hard drive in a Linux VM. You then get SSH access to this as you know from following the tutorial.
If you put the server in recovery mode you can probably download the via data via SFTP over SSH using FileZilla for example.
Hi Matt!!!
Really thanks for your fast reply, i contact this site for install windows http://kimsufitemplates.net/ and i think it’s a real copy and not a windows on VM. Yes, I can go inside with the rescue setting with vSSH (the same of putty) but than i don’t know what to do… i can’t open my windows with my data and program inside… I’m pretty desperate!!! (i hope you understand) Do you there is a way to restore my windows without backuping my data (with FileZilla) and reinstall it. Do you know also where i can found a guide for install windows not with VM but normally anyway.
Many thanks in advance!
Really thank you!
Filippo
I’m getting a device not found error when using the “ifconfig eth0” command. I’m doing this via a Ubuntu Desktop VM. Anybody what issue is/how to solve? TIA
Newer versions of Ubuntu no longer call the default network interface eth0, it’s name is randomly generated.
If you type ifconfig -a you should be able to find out the name of the network interface and follow the tutorial as normal. Mine was ens192 on a recent Ubuntu install i recently did.
Thanks Matt. Will give it a go 🙂
sorry for my english
hello, i have tried to install windows 2008R to my kimsufi ks-1 server, once setup has been done then on first boot ping replied for few minutes, after that it stopped reply and now waiting for 2 days and trying to restart hard boot my server does not come up can you help me thanks
That would suggest maybe the firewall has been enabled and is blocking access at a guess.
Hey Matt! Here again trying to install Windows 2012 R2 in this Kimsufi server:
KS-4C Core™ i5-2300
But I think network adapter driver doesn’t come with Windows 2012 R2…
Description: Ethernet interface
Product: 82579V Gigabit Network Connection
I tried to install it manually as you indicated but I found that this 82579V is not compatible with Windows 2012! So now how can I install Windows 2012 R2 according with your guide with this KS-4C that have a i5-2300 with 82579V Network card?
Thanks for your support!
Ivobeerens has created a guide to modify some Windows 8 drivers for the 82579V for use on Server 2012, you could try doing that on your VM before you sysprep it and see what happens: https://www.ivobeerens.nl/2012/08/08/enable-the-intel-82579v-nic-in-windows-server-2012/
I wanted to thank you for writing this up and posting it. It’s 6/16/2023 and this guide still works as an option to install a Custom Windows Server image on a brand new OVH host! You saved me so much time and energy after trying to use their IPMI interface to do the same thing and failing numerous times. Thank You! Thank You! Thank You!
Great to know this still works all these years later, glad the write up was useful!