


I own a Macbook Air and wanted to extract an OS X 10.8 Mountain Lion InstallESD.dmg from the Air. However as OS X 0.8 Mountain Lion came installed on my Macbook Air i could not obtain the InstallESD.dmg from the App Store.
So i needed some way to obtain the InstallESD.dmg, this would allow me to burn it to disc (if my Air had a DVD drive) create an installable USB stick for OSX or simply create an ISO so i can burn the install DVD on Windows.
It turns out you can extract a full OS X 10.8 Mountain Lion install disc from your Macbook Air / Pro quite easily. I found some old instructions on Macworld aimed at doing the same for OSX Lion on a Macbook Pro also worked for OSX Mountain Lion on my Macbook Air.
Here is how i obtained my InstallESD.dmg From my Macbook Air:
1. Open the Terminal, and type this command to list all partitions on your hard drive or SSD:
diskutil list
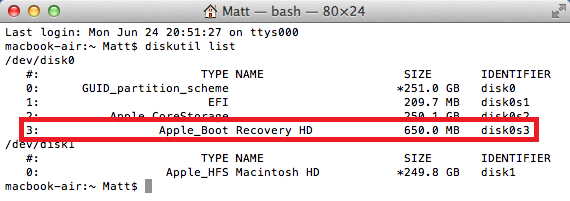
2. Look for ‘Recovery HD’ in the list, and note its identifier. It will be something of the form diskXsY, where X and Y are numeric digits, for me the identifier was disk0s3
3. Type the following command to mount the recovery HD:
diskutil mount readOnly /dev/[identifier]
4. Replace [identifier] above with the identifier you obtained from step 2. So on my machine, I typed:
diskutil mount readOnly /dev/disk0s3
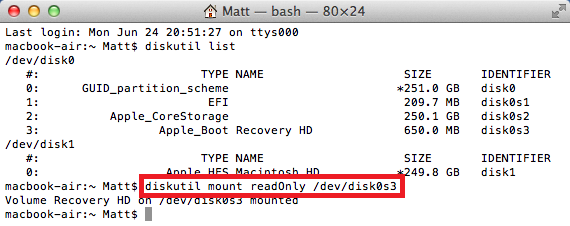
Your identifier could be different
5. The disk image inside the recovery HD is invisible, so use the Terminal to mount that too:
hdiutil attach “/Volumes/Recovery HD/com.apple.recovery.boot/BaseSystem.dmg”
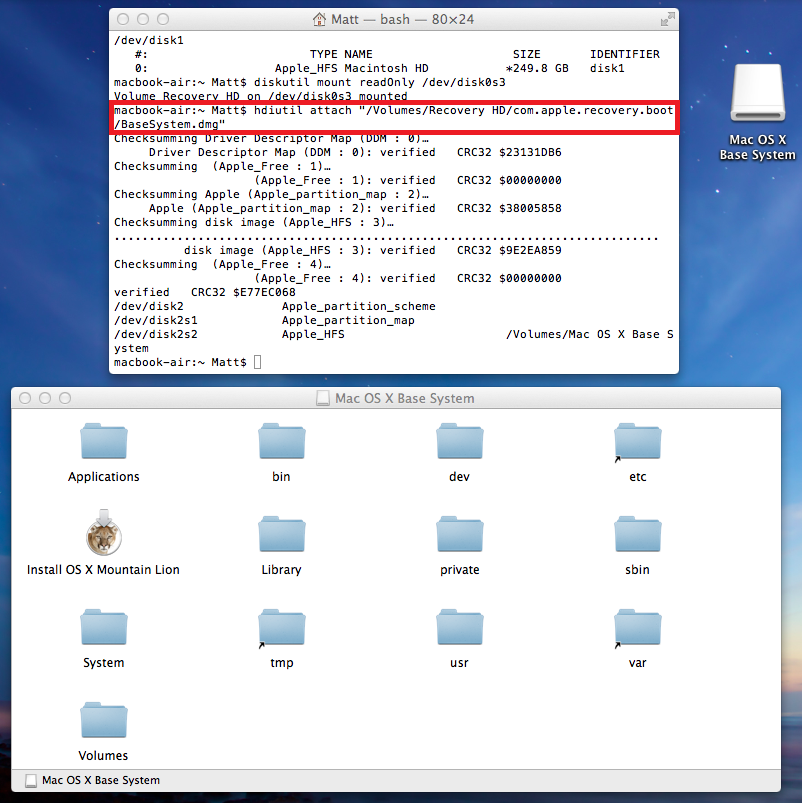
6. Now, from the newly mounted Mac OS X Base System image, double-click the ‘Install Mac OS X Mountain Lion’ application at the root of the disk.
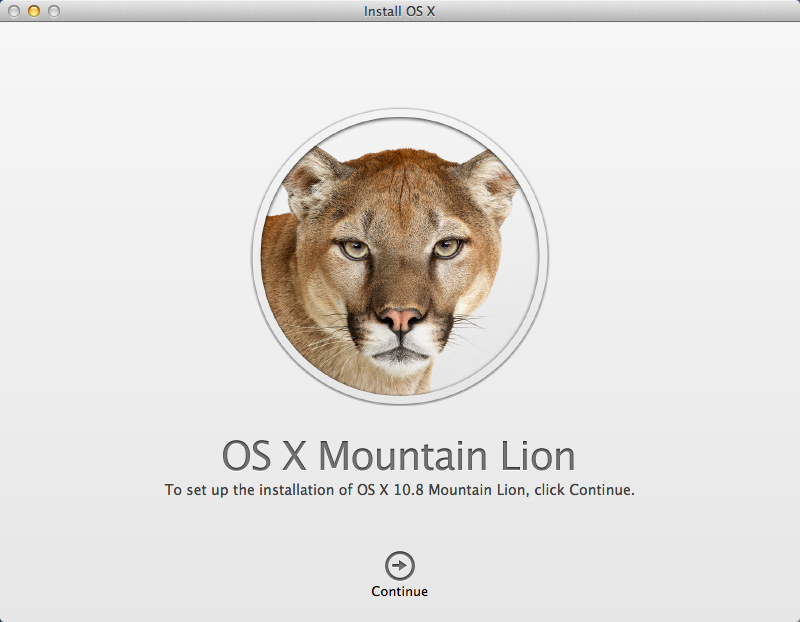
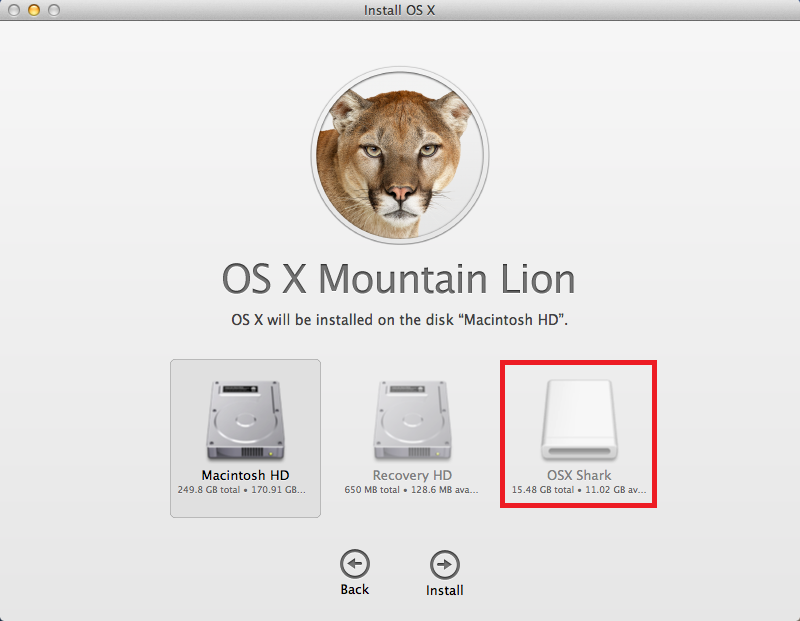
7. Go through the license agreement. Once it asks you for a disk to install on, choose the external drive or spare partition. For this i used a 16gb USB memory stick.
8. Enter your admin password when prompted, and the installer will start downloading.
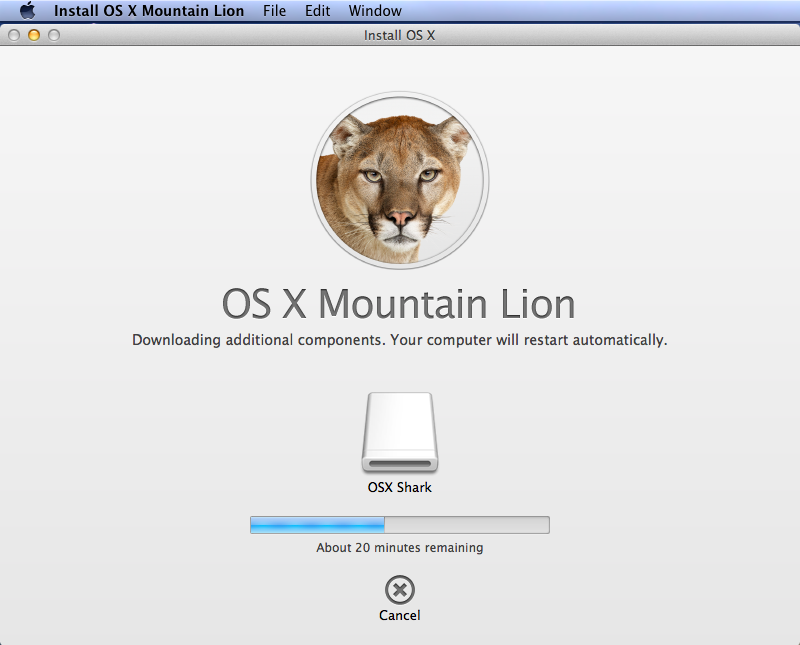
When the download has finished the installer will re boot your Mac, so we need to stop it from doing this.
MacWorld had the following tip:
Open an old-style (non-autosaving) application that still uses the traditional Save, Save As…, etc. commands in the File menu (I used TextWrangler) and make a new unsaved document, and type a few things in it. This will give you a little insurance against the installer rebooting the system, since the app won’t let the system reboot until you respond to its message asking whether you want to save the document or not.
I just kept an eye on it and force closed it before the timer counted to 0.
9. Once the file finishes downloading, the installer will extract the InstallESD.dmg image from it and delete the package. This will be fine as long as you don’t let the app restart your machine. Once the installer finishes download and prompts you to restart your Mac, force-quit it. Do this quickly, as it may automatically reboot for you after a 30 timeout period (although if you’ve got an unsaved document open, you should be able to prevent that).
10. If we look at the USB drive we told OSX to save the data to you should see an OS X Install Data folder
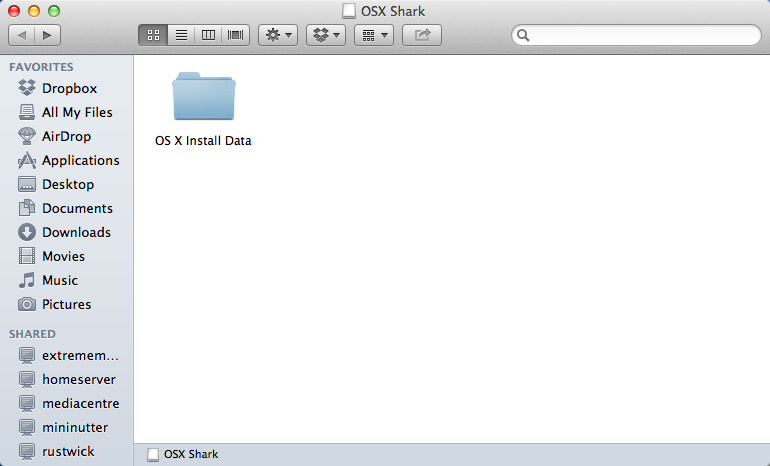
11. Open the OS X Install Data folder and you will find an InstallESD.dmg
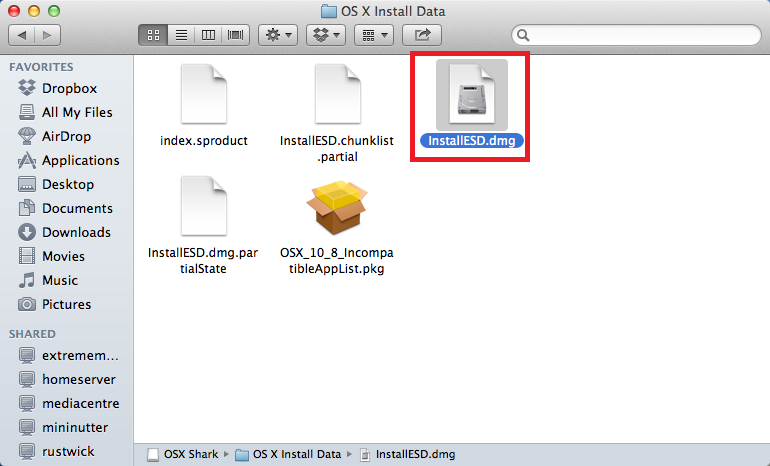
12. This is your full OS X 10.8 Mountain Lion install disc, you can burn it to a DVD, image it to a USB flash drive to create a USB installation disc or use dmg2iso to convert the DMG to an ISO which can be burned by a popular image burning application, such as ImgBurn on Windows. The ISO can be used on Esxi, VmWare and so on if you decide to convert the DMG to an ISO.
13. The end result is your choice of installation media for OS X 10.8 Mountain Lion, I wanted to obtain an ISO so i could install OS X 10.8 Mountain Lion on my VmWare Esxi Server. As you can see OSX 10.8.3 was downloaded, as 10.8.4 was only released a few days ago i imagine eventually you should be able to get an up to date install dmg by doing this.
9 Comments
i can’t get basesystem.dmg
im putting in that hidiutil command but nothing happen
i use a retina pro 13″ late 2012 running MOUNTAIN LION 10.8.4
help i need to install it on my imac which is running lion, i dont wanna spend 20 DOLLARS PLAINLY
Something else i recently found is the OS X Recovery Disk Assistant: http://support.apple.com/kb/DL1433
The OS X Recovery Disk Assistant lets you create OS X Recovery on an external drive that has all of the same capabilities as the built-in OS X Recovery: reinstall Lion or Mountain Lion, repair the disk using Disk Utility, restore from a Time Machine backup, or browse the web with Safari.
Note: In order to create an external OS X Recovery using the OS X Recovery Assistant, the Mac must have an existing Recovery HD.
That might be a much easier way of doing the above. If not did you manage to complete the other steps and mount your recovery partition which was called “Recovery HD”
The command is hdiutil not hidiutil incase you were typing it wrong.
Also if you were copying + pasting try typing the commands. I have seen problems in the past when people copy special characters such as quote marks.
You just have to show all invisible files with:
defaults write com.apple.Finder AppleShowAllFiles 1 (to hide hidden files type 0 instead of 1)
killall Finder
thank you sir. you are the man!
After this step:
Sasi:~ Sasi$ hdiutil attach -mount“/devices/Recovery HD/com.apple.recovery.boot/BaseSystem.dmg”
I end up here:
hdiutil: attach: unknown option “-mount“/devices/Recovery”
Usage: hdiutil attach [options]
hdiutil attach -help
Sasi:~ Sasi$
Please help me to overcome this problem..
Hello, please replace ” by ‘ in the command line:
hdiutil attach ‘/Volumes/Recovery HD/com.apple.recovery.boot/BaseSystem.dmg’
Thanks a lot Matt!!!
Your instructions are much appreciated. Works perfectly on my Mac mini which was shipped with preinstalled 10.8.x.
I keep getting this: hdiutil attach ‘/Volumes/Recovery HD/com.apple.recovery.boot/BaseSystem.dmg’
hdiutil: attach: extra image argument “HD/com.apple.recovery.boot/BaseSystem.dmg’” – “‘/Volumes/Recovery” already specified
Usage: hdiutil attach [options]
hdiutil attach -help
Hi, I got the same problem as you met, but it’s seems that there is no answer online. Did you solved it ? If you got the answer , please tell me. thanks a lot.